 Apparently the four most stressful events in your life are death, divorce, moving home or building a new house. After restoring four houses, the last a listed Heritage building, we were ready for a change. As we grew older, our bodies became less tolerant of cold winters, and the idea of living in a modern house began to have more appeal. We’ve lived in Otaki for over twenty years, and have no desire to live elsewhere. We wanted to live centrally, to be able to walk to the shops, so the Plateau and Te Horo weren’t considered.
First question was buy or build? The idea of building a house to suit our needs appealed. We looked at a number of show-homes and were pleasantly surprised at what was available within our budget. We explored the web, and were shocked at the number of horror stories from people dissatisfied with the big ‘design & build’ companies who advertise on television. Lots of promises on quality and timing, but abject failure to deliver was the common theme. We thought about having an architect design a house for us. An acquaintance who lectures in Architecture in Wellington suggested some architects who might suit. We wrote to three. The first to respond was blunt: our budget wasn’t big enough for the size of house we wanted. She said she couldn’t help. The second showed us pictures of his work, and seemed compatible, but when we did the sums we found that the standard architect’s commission of 10% of the build cost would blow our budget. The third architect didn’t respond I think our expectations frightened him.
We decided to explore the ‘design & build’ option.
We had a strong preference for local builders and sub-contractors. Gardner Homes were suggested. We knew Kylie Gardner from Nga Purapura. We did some ‘due diligence’, asking about build quality and customer satisfaction from people in the new Totara Park (Sue Avenue) subdivision. The responses were all very positive. We were impressed with their flexibility and willingness to have their designer work with us. The clincher came when we found a new build where Gardner’s designer had implemented the client’s design and the resulting house was seen as a great success by all parties. It was not your typical subdivision house.
So, having purchased land adjacent to Otaki College, we embarked on the journey of Design & Build with Gardner Homes.
Step 1 — The Designer
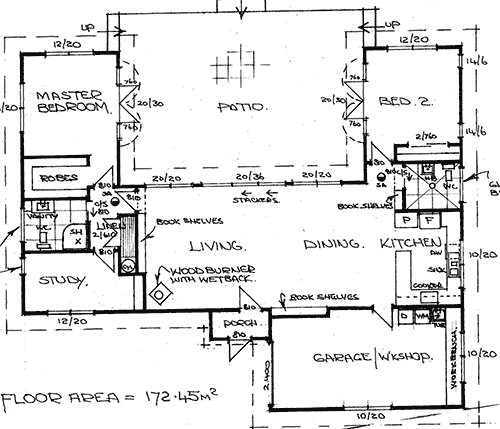 The Design is an integral part of Gardner’s approach, and was not costed separately. Following a site visit with Gardner Homes designer Waikanae’s Rob Meecham, we discussed our ideas, which were essentially a U shaped house with two bedrooms, an office, two bathrooms, garage and a living / dining / kitchen area of approximately 175sq metres. We wanted a polished concrete floor with a high thermal mass, a high level of insulation, photovoltaic panels on the roof to generate electricity and two bathrooms. The initial plans reflected the designer’s interpretation of our needs, and were subject to four revisions before a final design was arrived at. It was an easy and enjoyable process.
Step 2 — Costing the Design
This is where Kylie Gardner stepped up and coordinated all the subcontractors, to arrive at final costings. After three weeks, she came back with a price and a breakdown of costs that was within 5% of our budget.
Step 3 — Signing the Contract
A contract was presented that specified decision points in the process, at which time part invoices were to be presented for payment. This was a bit scary, because we had no experience of this process, and we proceeded with a fair measure of trust and expectation.
On 18 June we signed on the dotted line, and the building process began….
The first part, the Resource Consent process was handled adroitly by Gardners.
Step 4 — The Water Tank
 KCDC require every new build to include water storage. This involved a 10,000 litre concrete tank that was buried below ground level. Rasmac contractos did this. All the rainwater from the roof goes into this tank, which is non-potable, used for flushing toilets and watering the garden. While this doubtless added extra cost to the build, we were impressed with council’s pro-active approach to water conservation. Now we can water our garden knowing that we’re using untreated (un-metered) rain water.
Step 5 — Excavating the site, pouring the concrete slab

 We specified polished concrete floors, with a large ‘thermal mass’ of concrete foundation. This was accomplished by an innovative ‘rib-raft’ technique, where the insulated foundation sits on the ground, with reinforced concrete ribs. First a plastic sheet is laid, then huge polystyrene panels are laid on the plastic, with gaps to form the ribs. Reinforcing mesh is laid above the polystyrene, tied to reinforced piles that go down 2 metres. The process is seismically and energy-efficient. The polystyrene insulates the concrete from the ground.
 It requires lots of boxing to form the frames into which concrete is poured. Lyle McCarrison was Gardners front man on the job. Before this happens, all the plumbing has to be in place, to discharge kitchen & bathroom waste. Geoff Warwick and his boys did all the plumbing work.
Then it had to survive a KCDC inspection. Finally Higgins Concrete of Riverbank Road poured the slab. It took all morning and required 28 cubic metres of concrete in 5 mixer-loads. This phase took three weeks, finishing on 16 August, a week ahead of schedule, two months after the contract was signed.
Step 6 — Drains and services
The house is 60m from the street, so a ditch was dug by Gardner’s ace Wiremu for power, drainage, telephone and water. Once a temporary power box was installed, the lads could get to work. The last time I was on a building site, I saw builders with hammers, saws, levels and lots of hand tools.
Not any more. Levelling is done with sexy laser devices. Everything else is done with a power tool. Nail guns, saws, drills…you name it, it’s a power tool.
At the same time, the boys from Concrete Doctors arrived to grind the floor. This was a big job, taking eight hours for two people, generating heaps of noise & dust. Once ground to a smooth finish, the floor was covered in heavy black polythene.
Step 7 — Frames & Trusses
 A large part of a building is constructed off-site. One day a big truck arrived with a huge stack components, a week later all the framing was up. Frames & Trusses fabricated by Placemakers. Completed on schedule on September 8.
Step 8 — Roof on
 The roofing was completed on schedule, 26 September.
Meanwhile the exterior ‘wrapping’ stage began and windows and doors were installed while the house was pre-wired with electrical cabling. Geoff
Warwick’s lads were running plastic pipes in the roof.
Then came a shock. We specified a simple ‘board & batten’ exterior finish for the house. Because we had wanted an unpainted natural look, Kylie
Gardner hadn’t costed in the exterior painting, but it transpired that building regulations wouldn’t allow it. So the question was asked ‘would we like to do it?’ Gulp. This entailed 60 litres of Resene stain and three coats. Ann proved to be an expert with a roller.
Step 9 — Exterior Cladding, interior lining
Gib lining is pretty straightforward – or is it? Gardeners had decided that the roof in the big open-plan area would exhibit ripples unless they mounted it on a ‘Rondo’ system, which was laser-levelled. We hadn’t asked for this, but the final result is great.
Step 10 — Spouting, Guttering, Insulation
The roofers added the final touches, and the pink batt boys arrived to stuff batts into every conceivable place. We had specified double the thickness in the roof, to make the house even better insulated.
It’s now the last week in October, and we’re still on target.
Step 11 — Photovoltaic panels on the roof
 The house faces North, and it was easy to find space on the roof for twelve panels to generate electricity. Bryan Sharpe of Solarzone in Paraparaumu designed the system, which in full sun would deliver 3.12 kilowatts of electricity.
While the solar panels generate 12 volts DC, a clever inverter converts it to 230volts AC, which is the same as the national grid. The plan was for the house to be nearly self-sufficient on energy, selling surplus power to the grid, but more importantly only requiring power from the grid at night when the sun is not shining. The system does not use batteries, and is not meant to make us independent of electricity from the national grid, just to minimise our use of it. After the system was installed the power companies changed the rules, and decided they wouldn’t buy our surplus power at 25c per unit, but instead they’d pay us 8c. So much for the free market!
In the end it’s been a success: we have generated 743 Kw hours since the system went live. Solarzone estimated we would generate over 500 Kw hours/month in the summer months, which we are achieving. At 25c per KwH we’ve theoretically saved $186, and at this rate we will pay off the investment in around 8 years. In winter, when the sun’s energy isn’t so intense, we have a wetback on our woodburner, so hopefully our electricity bills will be minimal.
Step 12 — Plaster & paint
By now the builder’s work was nearing completion.
Plastering was done by Morgan Thorne of Dynamite Plastering, a local man who grew up with Hadley in Kirk Street, who had attachable leg extensions so he could plaster the ceilings without leaving the ground.
Then the Concrete Doctors polished the floor, and we could begin to see how it would look. We were excited!
With the floor covered again with plastic, Phil Seto and his offsider Hoani Roa got to work on decoration. They covered all the windows and sprayed the undercoat on all surfaces, then applied the final coats by roller and finally brush. Nice work, boys.
Step 13 — the Kitchen
Having seen the work of Owen Doran of About Kitchens, the choice was easy. We persuaded ourselves that we could afford a polished granite top to all work surfaces, and the decision was a good one.
Owen and his lads did a great job.
Step 14 — the final touches
The electrician fitted all the fittings, including eco-friendly LED lights.
Carpets and vinyl were laid.
The garage door was installed
And finally the KCDC Building Inspector came to make his final inspection and sign off the project.
Conclusion
 We were in by Christmas, less than six months after signing the contract.
Were we impressed ? You bet!
Would we do it again ? Emphatically yes.
The greatest satisfaction was an Otaki house built by (mostly) Otaki tradesmen to our budget and on time, without any drama and lots of good humour.
Good onya Gardners!
Now we have to build a garden…..